HP Officejet 6500 Series Printer Issues
Navigating the world of printers can sometimes be a frustrating endeavor, especially when faced with a series of issues. In this article, we delve into the common problems encountered by users of the HP Officejet 6500 Series Printer and explore potential solutions to help you overcome these hurdles effortlessly.
Use genuine HP cartridges
To resolve issues with your HP Officejet 6500 Series Printer, it is important to use genuine HP cartridges. Using non-HP cartridges may cause print quality problems or ink system failure. Ensure that the cartridges are properly installed and have enough ink levels.
If you are experiencing print quality issues, such as smudging or streaking, run a cleaning routine using the printer’s control panel. You can also try cleaning the printhead manually with a lint-free cloth dampened with water or alcohol.
If the printer is not picking up paper or experiencing paper jams, check for any obstructions in the paper path and make sure you are using the correct type and size of paper as recommended by the paper manufacturer.
For any other printer issues, refer to the HP Officejet 6500 Series Printer’s user manual or contact HP customer support for further assistance. Remember, using genuine HP cartridges and following proper maintenance procedures can help ensure the longevity and performance of your printer.
Check paper and print settings
To check paper and print settings on your HP Officejet 6500 Series Printer, follow these steps:
1. Open the document you want to print and click on “File” in the top menu.
2. Select “Print” from the drop-down menu.
3. In the print settings window, make sure the correct printer is selected in the “Printer” section.
4. Verify the paper size and type settings are correct for your document in the “Paper Size” and “Paper Type” sections.
5. Check the print quality settings in the “Print Quality” or “Quality” section. Adjust as needed for better printouts.
6. If you’re experiencing print quality problems, run a cleaning routine by accessing the printer’s control panel. Look for a “Clean Printhead” or similar option.
7. Ensure that the ink levels in your ink cartridges are sufficient for printing. Replace any empty or low ink cartridges.
8. If you’re still experiencing issues, consult the printer’s user manual or visit the HP support website for further troubleshooting steps.
Replace depleted cartridges
To replace depleted cartridges in your HP Officejet 6500 Series Printer, follow these steps:
1. Power on your printer and wait for it to enter the ready state.
2. Open the printer cover to access the cartridge carriage assembly.
3. Identify the depleted cartridge that needs to be replaced.
4. Gently grasp the cartridge and lift it out of the printer.
5. Remove the new cartridge from its wrapper or packaging.
6. Hold the cartridge with the print side facing towards the printer and align it with the correct slot in the carriage assembly.
7. Push the cartridge firmly into place until it clicks into position.
8. Close the printer cover.
9. Run a print test to ensure that the new cartridge is installed correctly.
Remember to always use genuine HP ink cartridges for optimal performance and to extend the life of your printer. If you continue to experience issues or need further assistance, consult the printer’s user manual or contact HP support.
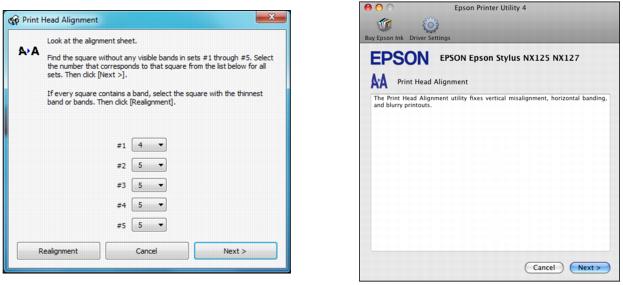
Clean and align the printhead
| Clean and Align the Printhead | |
|---|---|
| Issue | HP Officejet 6500 Series Printer Issues |
| Description | Printheads in the HP Officejet 6500 Series printer may become clogged or misaligned, resulting in poor print quality or streaks on printed pages. |
| Solution | To clean and align the printhead, follow these steps: |
|
|
| Note | Cleaning and aligning the printhead may use some ink, so make sure you have enough ink cartridges installed or replace them if necessary. |