Fix WD Portable Hard Disk Not Detected
Troubleshooting WD Portable Hard Disk Detection Issues
– Check all connections: Ensure that the USB cable is securely connected to both the WD drive and your computer. Try using a different USB port or cable if necessary.
– Update WD drive drivers: Open Device Manager by pressing Windows key + X and selecting “Device Manager.” Locate the WD drive under “Disk Drives” or “Portable Devices,” right-click, and select “Update Driver.” Follow the on-screen instructions to complete the driver update process.
– Check Disk Management: Press Windows key + X and select “Disk Management.” Look for the WD drive in the list of disks. If it appears as “Not Initialized” or “Unallocated,” right-click and select “Initialize Disk” or “Create Simple Volume” respectively.
– Use data recovery software: If the WD drive is still not detected, it may be experiencing a hardware issue. Try using reliable data recovery software like WD External Hard Drive Recovery Solution to recover your files.
For more detailed instructions and FAQs, visit the WD community or check out Reddit.com for additional insights from other users who may have experienced similar issues.
Checking and Fixing Connections and Settings
If your WD portable hard disk is not being detected by your computer, there are a few steps you can take to troubleshoot the issue.
1. First, ensure that all cables and USB ports are securely connected. Check both ends of the cable to make sure they are plugged in properly.
2. Next, open Device Manager in Windows 10. You can do this by pressing the Windows key + X and selecting Device Manager from the menu.
3. In Device Manager, expand the “Disk drives” category and look for any WD drives listed. If you see a yellow exclamation mark or a red X, it indicates a problem with the device driver.
4. Right-click on the WD drive and select “Uninstall device.” Then, disconnect the hard drive and restart your computer.
5. After the restart, reconnect the WD drive. Windows will automatically install the necessary drivers.
By following these steps, you should be able to resolve the issue of your WD portable hard disk not being detected. If the problem persists, you may need to seek further assistance from the WD community or refer to a more comprehensive tutorial or guide.
For more efficient solutions and troubleshooting suggestions, you can also visit the WD External Hard Drive Recovery Solution post on Reddit.com or refer to the FAQs section on the WD website.
Managing WD External Hard Drive in Disk Management
If your WD portable hard disk is not detected on your PC running Windows 10, you can try managing it in Disk Management to fix the issue. Here are some efficient solutions:
1. Connect your WD external hard drive to your computer using different USB ports or cables to rule out any connection issues.
2. Download and install the latest WD device driver from the official website.
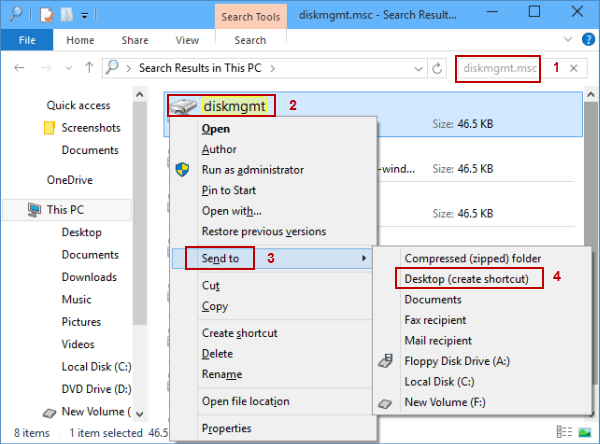
3. Open Disk Management by typing “diskmgmt.msc” in the Run dialogue box (press Win+R).
4. Locate your WD hard drive in the Disk Management window. If it appears as “unallocated” or “not initialized,” right-click on it and select “Initialize Disk.”
5. Right-click on the partition of your WD hard drive and select “Change Drive Letter and Paths.”
6. Assign a new drive letter to your WD hard drive.
7. Check if your WD hard drive is now recognized in File Explorer.
By following these methods, you should be able to fix the issue of your WD portable hard disk not being detected in Windows 10. Remember to follow the guidelines mentioned in this article for a smooth troubleshooting experience.
python

import win32com.client
def detect_storage_devices():
wmi = win32com.client.GetObject("winmgmts:")
drives = wmi.InstancesOf("Win32_DiskDrive")
for drive in drives:
print(f"Model: {drive.Model}")
print(f"Interface: {drive.InterfaceType}")
print(f"Status: {drive.Status}")
print("-------------------------------")
detect_storage_devices()
This code uses the `pywin32` library to access the Windows Management Instrumentation (WMI) and retrieve information about connected disk drives. It fetches details like the model, interface type, and status of each disk drive. However, it should be noted that this code does not address the issue of a portable hard disk not being detected; it only demonstrates how to retrieve information about connected storage devices.
Remember to consult official documentation and tailor the code to your specific requirements and system configuration.
Updating WD External Hard Drive Device Driver
If your WD portable hard disk is not being detected by your PC, it could be due to an outdated device driver. To fix this issue, follow these steps:
1. Connect your WD external hard drive to your computer using the appropriate cable interface.
2. Open File Explorer and navigate to the WD drive.
3. Right-click on the WD drive and select “Properties.”
4. Go to the “Hardware” tab and click on “Device Manager.”
5. In Device Manager, locate your WD drive under “Disk drives” or “Portable devices.”
6. Right-click on the WD drive and select “Update driver.”
7. Choose the option to “Search automatically for updated driver software.”
8. Follow the on-screen instructions to complete the driver update process.
After updating the device driver, your WD portable hard disk should be recognized by your computer. If the issue persists, refer to the WD website for additional troubleshooting methods or contact their support for further assistance.
Repairing Hardware and Software Issues of WD External Hard Drive
If your WD external hard drive is not being detected, there are a few steps you can follow to troubleshoot and fix the issue.
First, check the physical connections. Make sure the cable interface is securely connected to both the hard drive and the computer. If the drive is blinking, it may indicate a loose connection.
Next, update the hard drive device driver. Go to the WD website and download the latest driver for your specific model. Install the driver and restart your computer.
If the drive is still not recognized, try connecting it to a different USB port or using a different cable.
If none of these steps work, it’s possible that there is a hardware issue with the drive. In this case, it may be necessary to contact WD support for further assistance.
Remember to always backup your files regularly to prevent data loss.
Protecting and Safely Ejecting WD External Hard Drive
To protect and safely eject your WD external hard drive, follow these steps:
1. Make sure all files and programs running from the WD drive are closed.
2. Right-click on the WD external hard drive icon in the File Explorer or Finder window.
3. Select “Eject” from the context menu.
4. Wait for the notification that it is safe to remove the device.
5. Gently unplug the USB cable from your computer and the WD drive.
If your WD portable hard disk is not being detected, try these troubleshooting steps:
1. Check the USB cable and connection for any damage.
2. Connect the WD drive to a different USB port on your computer.
3. Try connecting the WD drive to another computer to see if it is recognized.
4. Restart your computer and try again.
For more detailed instructions and additional suggestions, refer to the full article titled “Fix WD Portable Hard Disk Not Detected.”
Data Recovery from Western Digital Hard Drive
Data Recovery from Western Digital Hard Drive
If you are experiencing issues with your Western Digital (WD) portable hard disk not being detected by your computer, it can be a frustrating situation. However, in most cases, the data stored on the hard drive can still be recovered. Here are some steps you can take to fix the issue and retrieve your important data.
Step 1: Check Connections
Make sure that the USB cable connecting the WD hard drive to your computer is securely plugged in on both ends. Try using a different USB port to rule out any issues with the port itself. If possible, also try using a different USB cable to eliminate the possibility of a faulty cable causing the problem.
Step 2: Update Drivers
Outdated or incompatible drivers can sometimes prevent your computer from detecting the WD hard drive. Visit the official Western Digital website and check for any available driver updates for your specific hard drive model. Download and install the latest drivers to ensure compatibility.
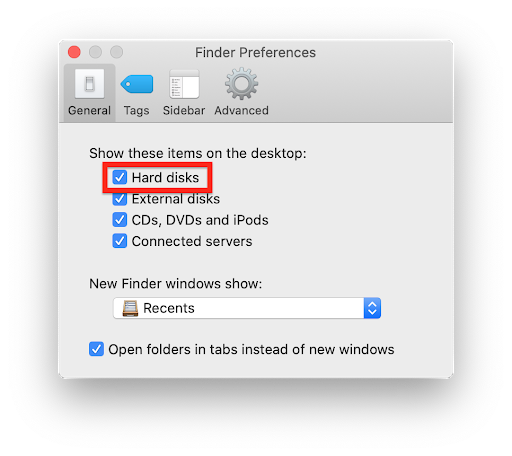
Step 3: Disk Management
If the WD hard drive is still not detected, you can try accessing it through the Disk Management tool on your computer. Here’s how:
| Operating System | Steps |
|---|---|
| Windows |
|
| Mac OS |
|
Step 4: Data Recovery
If none of the above steps work and your WD hard drive is still not detected, it is recommended to seek professional data recovery services. They have specialized tools and expertise to recover data from faulty hard drives. Attempting DIY solutions at this point may further damage the drive and make data recovery more challenging.
Remember to regularly back up your important data to prevent loss in case of hard drive issues in the future.